Monday, March 17, 2008

The Art of Composition, Part 2

Continued from Part 1

Step 4
Use your feet
The late photojournalist Robert Capa used to say, "If a picture's not good enough, you weren't close enough". He was talking mainly about war and conflict, of course, but in landscape his words still ring true.

Many photographers seem to have a pathological fear of getting close to subject, regardless of what it is. They see something in
terestin
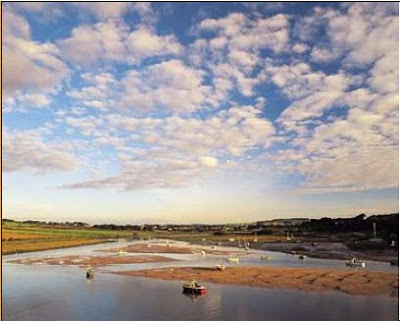
g, snap away without a care in the world, then wonder why the final picture has too much wasted space. So, the next time we're about to take a landscape photograph, stop for a second, have a last look at the composition an we ask ourselves if it could be improved by walking further into the scene, getting closer to foreground interest or finding something more suitable to fill the foreground. The difference this can make will amaze us.

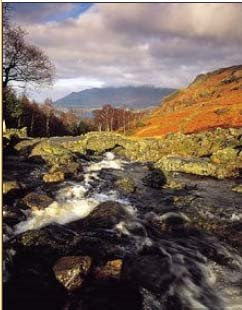
While feeling energetic it's also worth having a general look around the subject. That landscape might look rather nice from the lay-by at the side road, but what about if we walked around a corner, or up the hill behind us? The fact is we'll rarely get the best picture from the first viewpoint found, but unless the effort to explore the subject from different angles is made, we'll never know the alternatives. Sometimes all it takes is a slight change of viewpoint to completely transform the composition. Walking a few metres in any direction could give a far cle
arer view, get rid of unwanted distractions or provide important foreground interest.

The height from which to shoot should also be considered. Most photographers take every picture with the camera at eye level, but by kneeling down or standing on a wall we'll get a totally different view of the same scene. Many professionals even carry a step ladder for this purpose so they can gain a slightly elevated position and see much more of the scene they're trying to capture. Using our feet is a vitally important part of composing a picture, so never be afraid to wear out a little shoe leather.

Step 5
Choose the right format
Although it's natural to shoot landscape with the camera held horizontally in the 'landscape' format, turning the camera on its side can totally transform the composition. Upright pictures are far more energetic because the eye has further to travel from bottom to top. Vertical lines and height can also be emphasized to add tension and excitement, or rapture rivers and roads snaking away into the distance. The horizontal format is much more restful to look at because it suggest repose, and echoes the horizon itself - that's why it tends to be preferred by landscape photographers.


Step 6
Make the most of frames

Using manmade or natural features to frame pictures is a great way to tighten up the overall composition, get rid of annoying details and direct attention toward the main subject. All sorts of things can be used as frames: archways, door a
nd window openings, a hole in a wall, a gap in dense foliage between trees, the overhanging branches of a tree, bridges, even the play of shadow on a scene.

To make best use of frames, usually wide-angle lens works best, allowing to include the frame without obscuring the scene beyond. Setting the lens to a small aperture such as f/11 or f/16 will make the frame come out sharp. Alternatively, it can be blurred by setting a wide aperture and focusing carefully on the main subject. If the frame casts a shadow, step beyond it to take a meter reading, otherwise the main scene will be overexposed. In bright conditions the frame itself will record as a silhouette, which can look stunning.

Step 7 Break the rules
Throughout this feature we've looked at numerous guidelines that can be applied to improve the compositions of a picture. However, they're only there as a guide, and should be used as such. Actors are often told to learn their lines so they can forget them and improvise. It's exactly the same with composition. Once we know how these rules work, we can happily commit them to our subconscious and follow our instinct.

Often we'll get a far better picture by intentionally breaking the rules - placing the horizon across the middle of the picture, or the focal point in the centre. The thing to remember is that when doing something, make sure there is a reason for doing it. But most important of all, make it count.


Extracted from an article written by Lee Frost

Tuesday, March 11, 2008

The Art of Composition, Part 1

Think of a landscape photograph as a jigsaw puzzle, with dozens of different pieces demanding attention. If all those pieces are arranged in the right order then they'll be organized, structured image that makes sense and looks good. But if they are put in any odd way, the end result will be a muddled mess of shapes, colours, and details that's difficult to make sense of.

That, in a nutshell, is what composition's all about - arranging the elements of a scene in the camera's viewfinder so they form something visually interesting to look at; something that will hold the attention of the viewer and take their eye on a journey around the frame from immediate foreground to the distant background.

Every time you raise a camera to your eye you're composing a picture - the very act of deciding where to point it is based on a conscious or sub-conscious decision about what you want to include in the picture. The trouble is, many photographers don't spend enough time thinking about composition before firing away, and nine times out of ten the end result is unbalanced and unstimulating.

Often the main subject is too far away and marooned in a sea of empty space, or there are annoying distractions in the frame.
Many pictures have no obvious entry point, so the viewer's wanders around aimlessly, and lack any sense of depth or scale so they look flat.

Painters are one up on photographers when it comes to composing a picture, because if the scene before them isn't ideal they can move elements around the canvas until it is. We just have to accept what's there and make the best of it. Fortunately, this isn't as difficult as it soun
ds because by using different lenses, choosing your viewpoint carefully and thinking about which part of the scene you want to capture, it's possible to create successful compositions every time. There are also many compositional 'rules' and devices that can be used to help you take more interesting pictures, and the more picture you take, the better your natural sense of composition will become - until it becomes an intuitive act.

Step 1
Include foreground interest
Scenic pictures can often be improved dramatically simply by including something in the immediate foreground. Not only does foreground interest help to create a strong feeling of depth and scale, wh
ich is vitally important, but it also tightens-up the whole composition by pulling together the different elements in the scene, and provide an obvious entry point into the shot - the bottom is a natural place for the eye to start with conventional picture format. All kinds of things can be used as foreground interest - walls, rivers, rocks, hedges and trees, fences, roads, paths, flower beds and so on.

Wide-angle lenses are invaluable for emphasising foreground interest. By moving in close with a 24mm and 28mm lens even small features can dominate the whole shot, and exaggerate perspective to create powerful composition with the foreground looming large and the rest of the scene stretc
hing off into the distance. Wide-angle lenses also offer the added benefit of extensive depth of field. By stopping down to f/16 or f/22, everything will come out sharp from less than a meter in front of the camera to infinity.

Step 2
Use the rule of thirds
This is the oldest compositional trick in the book, and one that is used by both painters and photographers to create a visually balanced picture. Imagine shooting a landscape and there's an isolated farmhouse in the distance or a single tree in the middle of a field, acting as the main focal point. Most photographers would stick this subject in the centre of the frame - which can work in some situations. However, a more pleasing sense of balance can be get if it is positioned using the rule of thirds.

This can be done by dividing up cam
era's viewfinder into an imaginary grid using two horizontal and two vertical lines. The focal point is then placed on or near any of the four intersection points created by those lines. The rule of thirds can also be used to position the horizon. It's tempting to stick it across the centre of the frame, but unless when shooting a symmetrical scene, such as reflections in a lake, the result tends to look very static and lifeless.

A much better approach is to place the horizon one third from the top or the bottom of the frame, to emphasis either the sky or ground. To achieve this, divide the viewfinder into thirds using two imaginary horizontal lines, then compose the scene so the horizon falls on them.

Step 3
Make the most of lines

Lines just can't be beaten when it comes to adding depth and dynamism to a picture. As well as creating a strong sense of direction, they also carry the eye through the scene so it takes in everything along the way. If we keep our eyes peeled when shooting landscapes we'll see lines appearing everywhere: roads, rivers, railings, avenues of trees, road markings, telegraph poles, and railway tracks slicing through countryside, raking shadows cast by the evening sun and so on. All these and many more can be used to improve the composition of a picture.

Horizontal lines divide the scene in layers and produce a restful effect by echoing the horizon. The eye normally travels from left to right, and steadily upwards through the scene. Vertical lines are far more active so they give a picture tension and a strong sense of vertical direction - think of the towering trunks of coniferous trees reaching for the sky.


Diagonal lines are more energetic because they contrast strongly with horizontal and vertical elements and carry the eye through the whole scene. By suggesting perspective they also add depth. Lines moving from bottom left to top right work best because that's natural way for the eye to travel.

Converging lines created by roads, crop rows, avenues of trees and railway lines are ideal for adding a strong sense of depth, scale and perspective due to the way they rush away to the horizon and seem to move closer together with distance. To make the most of this effect, look straight down the lines and use a wide angle lens to exaggerate perspective. Include the point where the lines meet - the 'vanishing point' - is also a good idea as it brings the composition to a satisfying conclusion.

Finally, lines don't actually have to be straight to work in a composition. The graceful curves of meandering river will carry the eye through a scene just as effectively as an arrow-straight canal.


To be continued to part 2

Extracted from an article written by Lee Frost

Thursday, February 28, 2008

The Art of Photography

There are as many styles of photography as there are photographers. We each pursue the fulfillment that our offers by interpreting the world in different ways.

About Light
Many photographers look at the work of experienced landscape photographers and ask themselves, "Why can't my work look like that? Why are my photographs flat-looking and uninteresting?". The secret is the quality of the light. If we see the work of professionals landscape photographers, we will see that in the vast majority of cases the images were created within two hours of sunrise or sunset, or in fog, mist or rain. W
hy?

The answer is that the character of the light is as critical a component of a strong image as is the subject matter itself. Take as an example the image below.


This photograph was taken about an hour before sunset. The low sun created strong shadows on the foreground and the accumulated heat of the day had created a haziness to the air that softened the distant mountains and makes them featureless - a perfect backdrop for the photographer who is silhouetted against them. To get a shot like this we have to be prepared to rise very early in the morning to arrive at the preferred location and then be ready to end the shooting session within a couple of hours after sunrise. Good light begins a couple of hours before sunset.

Occasionally we can break the rule and shoot well into the late morning. Here is an example of a photograph that break the above rule.

As we can see here, this photograph was taken during late morning. It breaks the rule against mid-day shooting because the subject matter itself is so arresting. This photograph would have been even stronger if the buttes of the valley in the distance were illuminated by the rising or setting sun, or if the clouds in the distance had a bit more definition as a result of stronger side lighting.

Early morning is in many ways more preferable for shooting than in sunset. In many locations early morning is also a time of ground mists. Even when the day is overcast these conditions can create a moody effect that enhances an otherwise mundane scene.

Zen and The Art of Landscape Photography


Contemplation-not
Most people think of landscape photography as a quite and contemplative art. But it can also be considered more akin to the rush of a big game hunt. Because this type of photography is about the ever-changing nature of light as much as it is about location, in the rush to capture the fleeting moment of best-light, some people shoots in a sort of "mindless state" - where they simply focuses on being technically correct but not totally aware of what are they photographing.

To take pictures this way a photographer must trust his/her instinct and have the equipment and technique down pat. Only when photographer and equipment are in sync, and the photographer can take a photograph without even thinking about the gear, are the photographer let the "mindless" state take over and produce the best image it can.

It's a winner
Many times a photographer set out to do some serious photography only to return empty handed. Sure, they have a number of exposed roles of film, but not too many if any winners. This is the way things are. Only when they are in some of the most extraordinary locations and the light and mood are all cooperating do they get more than one or two really worthwhile images in a day; a long day. Most of the time things don't go that well. There's only one solution to this problem, Get out there and do some more shooting.

But it looked great when I was there
The shots that we think at the time are going to be the best, rarely are. If we are very exited about an image at the time of the shooting, we frequently will miss the mark. But, a shot taken at another time in an almost off-hand manner can often become one of the winners. Don't second guess. If it appeals at the time, shoot it. Let the subconscious work for us, not against us.


Extracted from an article written by Michael Reichmann


Saturday, February 9, 2008

Landscape Photography


Landscape photography is within the reach of anyone who enjoys the outdoors and owns even the most basic camera equipment.

Defining Landscape Photography
Landscape photography is difficult to define. The more landscape photography we do, the broader our definition may become. Landscape photography is not so much about what is contained in the image, but what it portrays about a place. While a landscape photograph might be a wide-angle image of a pristine lake or an ocean sunset, it might just as well be a dormant plant in a winter pond. If the lake, the sunset and the dormant plant image each reveal something significant about a place, its inhabitants, or its conditions and evoke an emotional response in the viewer, they can be qualified as landscape photographs. Grand or tiny, a landscape is not so much about the subject itself, but rather about the place in which the subject exists and the feeling the subject and place evokes.

Camera Equipment for Landscape Photography
We do not need to invest in a lot of expensive gear to begin exploring landscape photography. We can travel light and concentrate on taking pictures rather than changing lenses, so the gear of choice can be a digital camera like a Coolpix 5700 with a built in zoom lens. A zoom lens will give us ready access to a wide range of focusing distances that will allow us to explore different compositions within a single scene with little effort. The one additional piece of equipment recommended to carry would be a lightweight tripod. A tripod will ensure a steady camera at any shutter speed and allow us to fine tune compositions.

Landscape Photography in Our Own Backyard
What if the familiar places of the famous landscape photographers lay many states away from our own home? Who says these are the most worthy locations anyway? Landscape photography is not about a specific place, but about seeing the significance of the natural world around us every day. Our own backyard - literally - can be a great starting place because we know it better than any other place. If there is no backyard, a city or country park, a campground or even a drainage pond bordering the local shopping mall can provide a great starting place to explore landscape photography. Once we know a place well, we can anticipate things like how the light will cast a shadow at a particular time of day, or when a certain wildflower will be in bloom


Extracted from an article written by Dawn Lane

Wednesday, February 6, 2008

Improving Photography Composition

Light and shadow become integral parts of composition when skillfully incorporated, and should be our first consideration before setting up to make a photograph. When lighting conditions have been evaluated and the camera position chosen to take advantage of the light/ subject relationship, the next step is composing the photograph.

Composi
ng a photograph is essentially an editing process - deciding what to leave in and what to leave out. There are basic accepted criteria for good composition that, when applied, will help us achieve visual harmony or dynamic tension. Faithfully following all the "rules" of composition will not necessarily culminate in a good photograph. The rules are intended more as guidelines than strict dogma, but they will help us design well-balanced images that are pleasing to the eye. While it may be the subject that initially attracts viewers to stop and look at an image, it is the artistry of composition that holds them there.

Here are some basic elements of effective composition:

Strong Focal Point
It is usually best to have one m
ain subject as the focal point because a photograph can successfully tell only one story. The main subject can be one object or several, and you may decide to include a secondary subject. But make sure nothing detracts from the focal point. Lacking a strong center of interest forces the viewer to search for something to observe, eyes seeking a resting place. Always give the focal point sufficient prominence in the composition so that all other elements are subordinate. Even if the focal point is small, it can be given prominence by composing empty space around it.

Rule of Thirds
The exact ce
nter of any composition is not a satisfying place for the viewer's eye to come to rest. With the main subject placed in the center, the viewer is less likely to explore the rest of the photograph. In fact, it is preferable to keep the viewer's eye moving. To create movement in your photographs and to avoid the static bull's -eye composition, use the rule of thirds guidelines for off-center placement of the main subject. It is the traditional way to create a well-balanced composition and has been used by artist for centuries. To apply the rule of thirds, imagine the scene in your viewfinder divided into thirds both horizontally and vertically, similar to a tic-tac-toe grid laid over the scene. Place the main subject and other important elements of your composition along the grid lines or at the points where the grid lines intersect. Employing the rule of thirds not only helps avoid symmetrical composition but also provides a pleasing proportion of space around the main subject to prevent distracting tension between the focal point and the edge of frame.

A common compositional faux pas
occurs when the horizon is positioned directly through the middle of the frame, bisecting the scene. Utilizing the rule of thirds, the horizon is placed near one of the grid lines. This will lower or raise the horizon in the frame and give emphasis either to a dramatic sky or an interesting foreground.

Simplicity
The best way to present a clear message in a photograph is to keep the composition simple. The fewer elements you have to work with, the easier it is to design a pleasing image and control the viewer's eye movement. There are several ways to simplify a composition, but the primary method is to move in closer to the main subject. Photojournalist Robert Capa said it best: "If your pictures aren't good enough, you're not close enough". Whether you physically move the camera position closer or zoom in optically, getting closer allows you to fill the frame with the subject, paring the composition down to its essential components. It removes visual distractions from the edges of the frame, eliminates superfluous elements and defocuses the background. Shallow depth of field helps to isolate the subject from a busy background by blurring objectionable clutter, and may even create soft pools of complementary color behind the subject.


Leading Lines

Another compositional technique to create energy and movement in a photograph is the use of leading lines. Whether they are graceful curves, or dynamic diagonals, all lines should lead the viewer's eye to the focal point. But be careful with the use of leading lines. They can also work against us by directing the eye away from the subject or, if the line divides the photograph in two, leading it right out of the image.

A few other factors to consider when refining compositions:
  • Let the lines in the composition decide if the scene should be shot horizontally or vertically. If the scene should presents long vertical lines, compose vertically to take full advantage of them. When presented with strong horizontal lines, use a horizontal camera orientation. This plays to the strengths of the composition and also will help to avoid wasted space at the edges of the frame.
  • Be aware of white or light areas in the compositions. The viewer's eye will always go to the brightest part of the scene, so eliminate any bright spots that will pull attention away from the main subject.
  • Look for repetition of shapes and textures. Pattern create rhythm and motion in a composition.
  • Compose boldly using sweeping diagonal lines. Long horizontal lines can be static and visually boring. Conversely, diagonal lines add visual energy. Change camera angle to pivot prevailing lines so they don't run parallel to the top and bottom edges of the frames.
  • Try using wide-angle lens. Compose for a foreground, middle ground and background with overlapping compositional elements to create a three dimensional effect in a two dimensional photograph.

Extracted from an article written by Peter Ensenberger